Configuring Default Properties (Standard)
Configuring default properties is one step in the Preparing to Scan process.
Defining default properties before scanning applies the following values and settings to all documents in the current scanning session that have yet to be scanned.
- Default name
- Field values
- Tags
- Volume
- Destination
- A preference for how pages should be grouped into separate documents
Tip: Default properties can be modified for each document after scanning.
Note: Document name, template, and volume values are automatically inherited from the Options dialog box.
To configure default properties
- Select the Default properties node in the Scanning Explorer Pane.
- In the Document Properties Pane, assign a
 default document name. Click
  to use tokens.
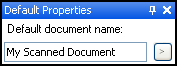
Note: Use tokens to ensure each scanned document has a unique name. Documents without unique names will be renamed once they are stored. Give me an example.
Example: If you assign a default name of My Scanned Document, only the first document sent to a Laserfiche repository will retain this name. Additional documents will have their names appended with (number), such as My Scanned Document (2) and My Scanned Document (3).
- Select the Fields tab. Assign a template and/or field values. Click to use tokens.
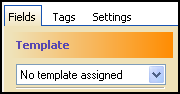
Note: A  icon indicates an error associated with a field. Hover over the icon for more information.
Tip: Click Clear Fields at the bottom the Document Properties Pane to remove all field values.
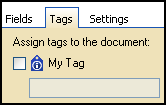
- Select the Tags tab. Assign and/or remove tags and tag comments.
- Select the Settings tab.
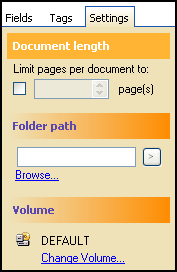
- Under Document Length, specify if and how often pages should be grouped into separate documents (based on the number of pages scanned). Give me an example.
Example: Assume you limit pages per document to three. Scanning 12 pages will result in four separate documents, each with a page count of three.
Note: Scanner malfunctions do not reset the Document Length setting's page count.
- Under Folder Path, specify where scanned documents will be stored. Click Browse to select a repository location or manually enter a destination path. Click to use tokens.
- Specify a volume for the documents to be stored in.
- If your repository supports digital signatures and you want to automatically sign scanned documents, select Auto-sign documents. The document signing dialog will open to allow you to configure your signature.